Yeast Harvesting
12 posts
• Page 1 of 1
Yeast Harvesting
 by scarecrow » Mon Sep 09, 2013 1:20 am
This is a method I use to save my yeast. It is not worth the effort to save bread making yeast because it is cheap, but with some yeasts costing over $150/kg, you can’t afford to waste it.
This is particularly suited to saving blends of yeasts that you like that give you that special batch of home brew.
What you need:
4 small pickling jars (about a litre each)
1 big pickling jar (about 4 litres)
A pair of tongs
A BOP for boiling water
Everything needs to be boiled, otherwise the yeast will pick up an infection and then it’s over.
Add the jars (with lids) and the tongs to the BOP and add enough water to cover. Make sure jars are full of water.
Boil for about 30 mins to sanitize everything. This will also get rid of the oxygen in the water.
This is important because it basically deactivates the yeast (puts them to sleep).
Take the jars and lids out with the tongs, keeping them full of water.
Do not touch the jars with anything but the tongs. Be careful, the jars will be hot.
You can now handle the outside of the jars with your hands.
Don’t touch the inside of the jars or lids with your fingers.
Put the lids on the jars. Put the jars in the fridge overnight to cool down.
Now, once you have taken your wash off the grain/yeast bed, we need to dilute this yeast bed with the water from the jars we let cool down overnight.
So, add the contents of the big jar and the small jars to the yeast bed. Remember to only touch the outside of the jar and lids.
Swirl it around to mix the water in.
Don’t use anything to stir it up or your will contaminate it.
What we need to do is separate the yeast from the trub (muck on the bottom) by letting it settle.
But not for too long, otherwise both the yeast and the trub will settle on the bottom.
The heavy trub will settle out very quickly. The yeast will stay suspended just above the trub.
Let it sit for a few minutes to settle out the grain and/or rubbish.
Then carefully pour the top layer into the large pickling jar till full.
You don't need to collect all of it. Put the lid back on the 4 litre jar.
Let this sit for about 30 mins or so. It will start to separate out into 3 layers.
The stuff you want is the middle layer. The bottom layer is some more trub, and the top layer will be mostly water.
Now, we need to separate the yeast a bit more.
This is the tricky part. Once you start to pour, you can’t put the jar down or you will mix everything back up. Try to pour as smoothly as possible.
If there is a lot of water in the top layer, carefully pour this off.
Now, without agitating the jar, pour the middle layer into the 4 smaller jars.
Do not agitate the trub on the bottom if possible. Again, don’t touch the inside of the jars or lids with your fingers.
As before, you do not want to pour the trub into the smaller jars. Leave it behind, even if it means leaving some of the yeast.
Put the lids on and label the jars.
Store them in the fridge till needed.
To use a jar, take it out of the fridge, let it warm to room temperature, pour off half the top layer of water and give it a quick shake to mix it up a bit. Add the yeast to your mash.
This method gets easier every time you do it. With good hygiene, you can keep a batch of yeast going for years.
scarecrow
This is particularly suited to saving blends of yeasts that you like that give you that special batch of home brew.
What you need:
4 small pickling jars (about a litre each)
1 big pickling jar (about 4 litres)
A pair of tongs
A BOP for boiling water
Everything needs to be boiled, otherwise the yeast will pick up an infection and then it’s over.
Add the jars (with lids) and the tongs to the BOP and add enough water to cover. Make sure jars are full of water.
Boil for about 30 mins to sanitize everything. This will also get rid of the oxygen in the water.
This is important because it basically deactivates the yeast (puts them to sleep).
Take the jars and lids out with the tongs, keeping them full of water.
Do not touch the jars with anything but the tongs. Be careful, the jars will be hot.
You can now handle the outside of the jars with your hands.
Don’t touch the inside of the jars or lids with your fingers.
Put the lids on the jars. Put the jars in the fridge overnight to cool down.
Now, once you have taken your wash off the grain/yeast bed, we need to dilute this yeast bed with the water from the jars we let cool down overnight.
So, add the contents of the big jar and the small jars to the yeast bed. Remember to only touch the outside of the jar and lids.
Swirl it around to mix the water in.
Don’t use anything to stir it up or your will contaminate it.
What we need to do is separate the yeast from the trub (muck on the bottom) by letting it settle.
But not for too long, otherwise both the yeast and the trub will settle on the bottom.
The heavy trub will settle out very quickly. The yeast will stay suspended just above the trub.
Let it sit for a few minutes to settle out the grain and/or rubbish.
Then carefully pour the top layer into the large pickling jar till full.
You don't need to collect all of it. Put the lid back on the 4 litre jar.
Let this sit for about 30 mins or so. It will start to separate out into 3 layers.
The stuff you want is the middle layer. The bottom layer is some more trub, and the top layer will be mostly water.
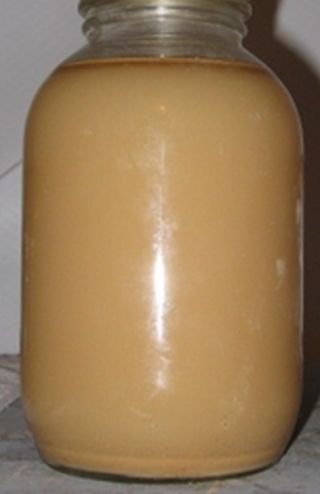
Now, we need to separate the yeast a bit more.
This is the tricky part. Once you start to pour, you can’t put the jar down or you will mix everything back up. Try to pour as smoothly as possible.
If there is a lot of water in the top layer, carefully pour this off.
Now, without agitating the jar, pour the middle layer into the 4 smaller jars.
Do not agitate the trub on the bottom if possible. Again, don’t touch the inside of the jars or lids with your fingers.
As before, you do not want to pour the trub into the smaller jars. Leave it behind, even if it means leaving some of the yeast.
Put the lids on and label the jars.
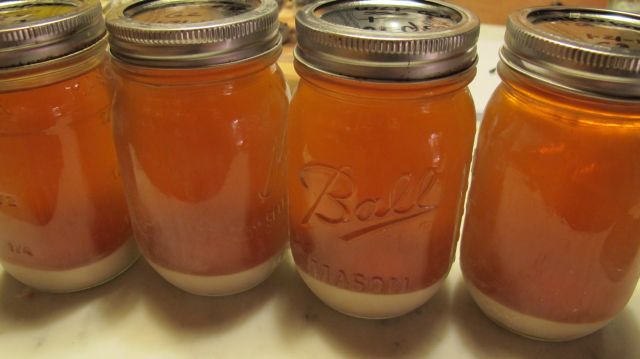
Store them in the fridge till needed.
To use a jar, take it out of the fridge, let it warm to room temperature, pour off half the top layer of water and give it a quick shake to mix it up a bit. Add the yeast to your mash.
This method gets easier every time you do it. With good hygiene, you can keep a batch of yeast going for years.
scarecrow
-

scarecrow - Regular

- Posts: 62
- Joined: Thu Dec 06, 2012 9:40 am
- Location: Far Northern NSW, Australia
- Stills: 4" CM hybrid
Re: Yeast Harvesting
by chill » Mon Sep 09, 2013 2:24 am
Great information Scarecrow, thank you!
Chuck
Chuck
-

chill - Master Distiller

- Posts: 1660
- Joined: Tue Mar 13, 2012 4:46 am
- Location: We(s)t Coast of Canada
- Stills: Easy Still
Re: Yeast Harvesting
by Almanac » Mon Sep 09, 2013 8:06 am
This is the type of information and advice that should be made into a stickie so it's at the top of the thread all the time.
AM
AM
Almanac
- Almanac
- Senior Distiller
- Posts: 1847
- Joined: Thu Oct 07, 2010 12:09 am
Re: Yeast Harvesting
by amaark » Mon Sep 09, 2013 9:51 am
Great piece of information.
Thanks for sharing it.

Thanks for sharing it.
Catch ya
amaark
...everyone needs a hobby...
amaark
...everyone needs a hobby...
-

amaark - Experienced Distiller
- Posts: 101
- Joined: Fri Apr 19, 2013 8:26 am
- Location: Somewhere Hot!
- Stills: Smart Still
Re: Yeast Harvesting
by Almanac » Mon Sep 23, 2013 8:03 am
Next time Jimmy is in town he might make this a stickie so that it stays at the top of the thread as this is a great skill building lesson that should not be lost by slipping down the pages.
AM
AM
Almanac
- Almanac
- Senior Distiller
- Posts: 1847
- Joined: Thu Oct 07, 2010 12:09 am
Re: Yeast Harvesting
by Capt-Cudellez » Mon Sep 23, 2013 5:31 pm
aidanmac wrote:Next time Jimmy is in town he might make this a stickie so that it stays at the top of the thread as this is a great skill building lesson that should not be lost by slipping down the pages.
AM
Now sticky AM.
-

Capt-Cudellez - Donated to StillSmart

- Posts: 1139
- Joined: Tue Dec 07, 2010 12:22 am
- Location: Scotland
- Stills: SS VM, Stripper, Pot
Re: Yeast Harvesting
by Almanac » Mon Sep 23, 2013 6:58 pm
You don't even look like Jimmy 
AM
AM
Almanac
- Almanac
- Senior Distiller
- Posts: 1847
- Joined: Thu Oct 07, 2010 12:09 am
Re: Yeast Harvesting
by Frank » Thu Sep 26, 2013 10:04 am
+1 re great informative post etc....simple/effective/yes please
Its a proven method of keeping your precious yeasties (and/or saving $)
(and, if you ask nicely, I reckon Scarecrow might add even more info to these findings, as he's that kind of guy..... )
Its a proven method of keeping your precious yeasties (and/or saving $)
(and, if you ask nicely, I reckon Scarecrow might add even more info to these findings, as he's that kind of guy.....
)-

Frank - Senior Distiller
- Posts: 284
- Joined: Sat Mar 05, 2011 1:04 pm
- Location: On my laptop, in my campervan, travelling.
- Stills: Potstill,LM Boka
-

wormwood - Experienced Distiller
- Posts: 138
- Joined: Mon Feb 13, 2012 6:38 pm
- Location: USA
- Stills: Air Still
Re: Yeast Harvesting
by HHG » Tue Dec 10, 2013 10:11 pm
Would this method work using the mash of Classic turbo yeast and Turbo Carbon ? 
-
HHG - Newcomer
- Posts: 1
- Joined: Tue Dec 10, 2013 9:42 pm
Re: Yeast Harvesting
by Almanac » Wed Dec 11, 2013 12:15 am
By the time a Turbo has finished all the yeast cells are dead or on the verge of suicide. Wash that shit down the drain because even if you could reuse it you wouldn't like the end product 
AM
AM
Almanac
- Almanac
- Senior Distiller
- Posts: 1847
- Joined: Thu Oct 07, 2010 12:09 am
Re: Yeast Harvesting
by Easydrinker » Wed Dec 11, 2013 12:59 am
I wouldn't know about harvesting any turbos this way,but you can certainly re-use an alcotec 48 yeast cake/sludge,if you give it a little nutrient on the next wash.
And that is using only half of the original pack of yeast in the original wash.
For certain there are lots of dead ghost hulls to help feed the the next generation,maybe that's what does it.
The wash should come out the same as it's first generation parent.
I have never gone beyond second generation,-time,life and stuff gets in the way.
Robert.
And that is using only half of the original pack of yeast in the original wash.
For certain there are lots of dead ghost hulls to help feed the the next generation,maybe that's what does it.
The wash should come out the same as it's first generation parent.
I have never gone beyond second generation,-time,life and stuff gets in the way.
Robert.
There is no ONE way.
-

Easydrinker - Donated to StillSmart
- Posts: 5206
- Joined: Fri Jun 21, 2013 7:09 pm
- Location: The hills of lowland Scotland
- Stills: Smart & Silly
12 posts
• Page 1 of 1
Who is online
Users browsing this forum: No registered users and 1 guest