Yeast Harvesting
 Posted: Mon Sep 09, 2013 1:20 am
This is a method I use to save my yeast. It is not worth the effort to save bread making yeast because it is cheap, but with some yeasts costing over $150/kg, you can’t afford to waste it.
This is particularly suited to saving blends of yeasts that you like that give you that special batch of home brew.
What you need:
4 small pickling jars (about a litre each)
1 big pickling jar (about 4 litres)
A pair of tongs
A BOP for boiling water
Everything needs to be boiled, otherwise the yeast will pick up an infection and then it’s over.
Add the jars (with lids) and the tongs to the BOP and add enough water to cover. Make sure jars are full of water.
Boil for about 30 mins to sanitize everything. This will also get rid of the oxygen in the water.
This is important because it basically deactivates the yeast (puts them to sleep).
Take the jars and lids out with the tongs, keeping them full of water.
Do not touch the jars with anything but the tongs. Be careful, the jars will be hot.
You can now handle the outside of the jars with your hands.
Don’t touch the inside of the jars or lids with your fingers.
Put the lids on the jars. Put the jars in the fridge overnight to cool down.
Now, once you have taken your wash off the grain/yeast bed, we need to dilute this yeast bed with the water from the jars we let cool down overnight.
So, add the contents of the big jar and the small jars to the yeast bed. Remember to only touch the outside of the jar and lids.
Swirl it around to mix the water in.
Don’t use anything to stir it up or your will contaminate it.
What we need to do is separate the yeast from the trub (muck on the bottom) by letting it settle.
But not for too long, otherwise both the yeast and the trub will settle on the bottom.
The heavy trub will settle out very quickly. The yeast will stay suspended just above the trub.
Let it sit for a few minutes to settle out the grain and/or rubbish.
Then carefully pour the top layer into the large pickling jar till full.
You don't need to collect all of it. Put the lid back on the 4 litre jar.
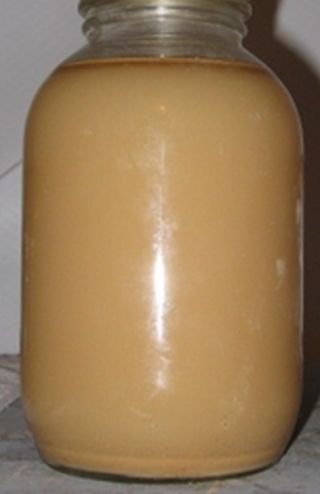
Let this sit for about 30 mins or so. It will start to separate out into 3 layers.
The stuff you want is the middle layer. The bottom layer is some more trub, and the top layer will be mostly water.
Now, we need to separate the yeast a bit more.
This is the tricky part. Once you start to pour, you can’t put the jar down or you will mix everything back up. Try to pour as smoothly as possible.
If there is a lot of water in the top layer, carefully pour this off.
Now, without agitating the jar, pour the middle layer into the 4 smaller jars.
Do not agitate the trub on the bottom if possible. Again, don’t touch the inside of the jars or lids with your fingers.
As before, you do not want to pour the trub into the smaller jars. Leave it behind, even if it means leaving some of the yeast.
Put the lids on and label the jars.
Store them in the fridge till needed.
To use a jar, take it out of the fridge, let it warm to room temperature, pour off half the top layer of water and give it a quick shake to mix it up a bit. Add the yeast to your mash.
This method gets easier every time you do it. With good hygiene, you can keep a batch of yeast going for years.
scarecrow
This is particularly suited to saving blends of yeasts that you like that give you that special batch of home brew.
What you need:
4 small pickling jars (about a litre each)
1 big pickling jar (about 4 litres)
A pair of tongs
A BOP for boiling water
Everything needs to be boiled, otherwise the yeast will pick up an infection and then it’s over.
Add the jars (with lids) and the tongs to the BOP and add enough water to cover. Make sure jars are full of water.
Boil for about 30 mins to sanitize everything. This will also get rid of the oxygen in the water.
This is important because it basically deactivates the yeast (puts them to sleep).
Take the jars and lids out with the tongs, keeping them full of water.
Do not touch the jars with anything but the tongs. Be careful, the jars will be hot.
You can now handle the outside of the jars with your hands.
Don’t touch the inside of the jars or lids with your fingers.
Put the lids on the jars. Put the jars in the fridge overnight to cool down.
Now, once you have taken your wash off the grain/yeast bed, we need to dilute this yeast bed with the water from the jars we let cool down overnight.
So, add the contents of the big jar and the small jars to the yeast bed. Remember to only touch the outside of the jar and lids.
Swirl it around to mix the water in.
Don’t use anything to stir it up or your will contaminate it.
What we need to do is separate the yeast from the trub (muck on the bottom) by letting it settle.
But not for too long, otherwise both the yeast and the trub will settle on the bottom.
The heavy trub will settle out very quickly. The yeast will stay suspended just above the trub.
Let it sit for a few minutes to settle out the grain and/or rubbish.
Then carefully pour the top layer into the large pickling jar till full.
You don't need to collect all of it. Put the lid back on the 4 litre jar.
Let this sit for about 30 mins or so. It will start to separate out into 3 layers.
The stuff you want is the middle layer. The bottom layer is some more trub, and the top layer will be mostly water.
Now, we need to separate the yeast a bit more.
This is the tricky part. Once you start to pour, you can’t put the jar down or you will mix everything back up. Try to pour as smoothly as possible.
If there is a lot of water in the top layer, carefully pour this off.
Now, without agitating the jar, pour the middle layer into the 4 smaller jars.
Do not agitate the trub on the bottom if possible. Again, don’t touch the inside of the jars or lids with your fingers.
As before, you do not want to pour the trub into the smaller jars. Leave it behind, even if it means leaving some of the yeast.
Put the lids on and label the jars.
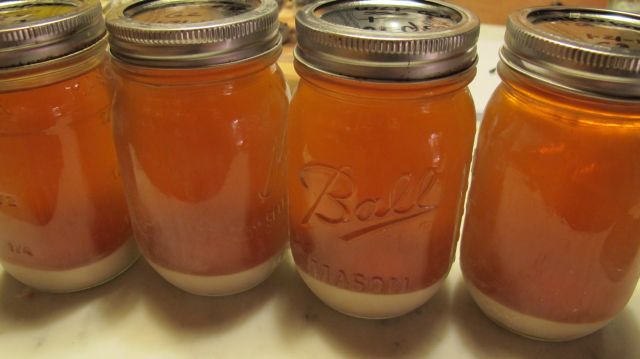
Store them in the fridge till needed.
To use a jar, take it out of the fridge, let it warm to room temperature, pour off half the top layer of water and give it a quick shake to mix it up a bit. Add the yeast to your mash.
This method gets easier every time you do it. With good hygiene, you can keep a batch of yeast going for years.
scarecrow


